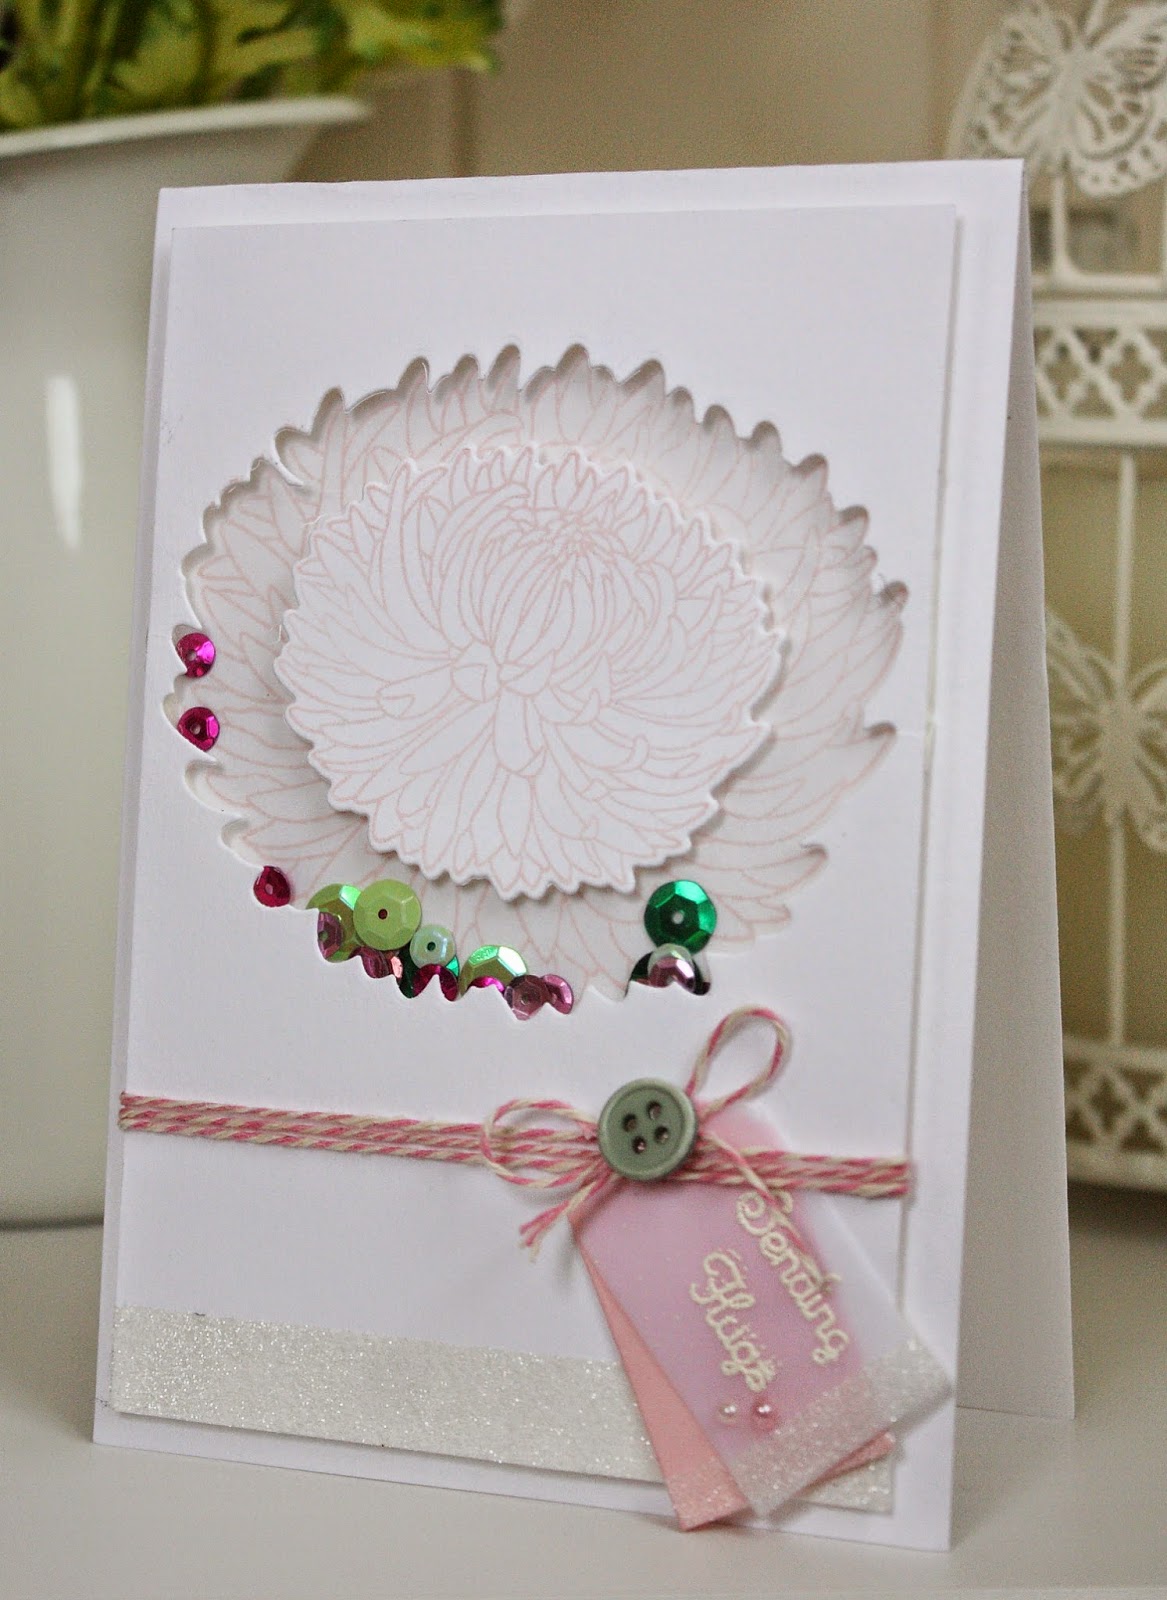
LE Designs Blog Monthly Events

LE Designs Blog Monthly Events
1st Thursday of the month - A review of a craft product
2nd Thursday of the month - Craft room inspiration
3rd Thursday of the month - Stamp set/die cutter review
4th Thursday of the month - A craft room storage idea
Any 5th Thursday in a month - *GIVEAWAY*

Saturday 21 June 2014

Guest Designer spot - Inkspirational Card Challenges

The sneak peek...


Good morning all and thank you so much for visiting my blog today. As you will see from the post title, today I am the Guest Designer over at Inkspirational Card Challenges.

As always, I was completely surprised to be announced as a top 3 winner with the card I made for my little Boy's 3rd Birthday as seen below, but even more shocked when I was chosen from the three to act as Guest Designer. I am honoured to be asked to do this, but I always find it rather daunting too. I always feel you have to create something truly spectacular to show yourself worthy of the opportunity.


When I was told the theme - blue with cream or white….I did initially panic at just how broad this theme was. However, I took a deep breath, got out my sketch book and began thinking of ideas to explore. Carol who is one of the designers at Inkspirational Card Challenges is a huge fan of shaker cards. This is something I have always wanted to try (I use a lot of sequins, crystals and pearls on my cards and so this was right up my street) and so I knew this was the way forward.

I thought back to the reason my 3rd Birthday card was chosen as the winner and it was due to the personality and emotion that shone through from it. I knew I had to put this same passion in to the card I was about to design and make.

As some of you will know, we lost my Grandad quite suddenly a few months back. He was a great watercolorist and I was honoured to become the proud owner of all of his painting equipment. I knew this card had to contain some form of water colouring. His wife (my Gran) is in a nursing home with Dementia. It is her birthday in August and I decided that it seemed very appropriate that the card should be for her. My Gran was a HUGE fan of butterflies. Everything had to have them on it - jewellery, scarves, ornaments etc. One of my favourite stamps is the butterfly from Visible Image and so I decided that this would have to feature too.

When I watched a tutorial for shaker cards, it was a square shaped shaker that was created. I never like to directly copy something I have seen and so I decided instead to create a hand drawn (very rough) butterfly shape. I used blue glitter card to add a touch of sparkle to the card. For the base of the shaker, I decided to use a technique I had learned on the Watercolour for Card Makers class which involves stamping and image, covering with masking fluid and then water colouring over the top. Once you remove the masking fluid, you are left with a completely unpainted stamped image. I stamped the large butterfly from Visible Image in Memento Paris Dusk and then used a few varying shades of blue paint for the water colouring. Once dried I added some white watercolour paint splatters and then peeled off the masking fluid. I wanted to give the butterfly some sparkle too and so I painted over it with a fine layer of  a water and pearl coloured perfect pearls mixture. This really gives a very subtle 'glisten' to the butterfly which is what I was aiming to achieve. Once dried, I added some blue and white sequins  and stars and then attached my shaker butterfly layer.  I already knew that I wanted to make this a double layered shaker and so I stamped, painted with perfect pearls and cut out the smaller butterfly from Visible Image. I added this to the top of the shaker and put dark blue pearls down the centre of the wings.

I had a gorgeous 'butterfly' sayings stamp in a set my Husband bought me for my Christmas by Personal Impressions that reads 'Birthday Wishes and Butterfly Kisses.' This seemed so appropriate for this card. I stamped this under the shaker in Paris Dusk and added a few accents by way of a hand drawn/cut heart made of white glitter card and a few blue crystals. Viola! Card finished. This card is SO what my Gran would have loved in days gone by. I say that because her memory has been completely taken over by the dementia and she doesn't remember the loves she once had. Her other great love was shoes….and lots of them! She had at least two big trunks full of high heels. I on the other hand, have just a wardrobe filled with shoes and handbags….I wonder who I take after???!!!

I hope you have enjoyed reading my ramblings and like the card. Any comments as always are so very much appreciated.

Laura xx


Tuesday 17 June 2014

Runway Inspired Challenge 62

Good afternoon all,

It has been beautiful sunshine here in Scotland and so I have been making the most of getting all possible washing done!! I have realised though that I must get going with making Thank You cards for my son's teachers as term ends in a couple of weeks. As soon as I saw the inspiration photo over at Runway Inspired Challenge, I knew exactly what stamp had to be used and I was desperate to try out something I had been thinking about over the past few days. The stamp of course is my new Hummingbird one from Uniko Studio and the idea was to emboss on acetate and use this as a top layer over and already stamped image of the bird and in-between, put various coloured crystals on the wings to create a rainbow, shimmering effect. I am pleased with the way this has turned out. For the stomach of the the bird, I paper pierced a bit of watercolour paper and water coloured in cobalt blue - similar to the main colours of the dress given as inspiration.

Here is the inspiration photo -

Isn't it a gorgeous dress!!! And here is my interpretation in the way of a Thank You card for my son's teacher.


Thank you for looking and as always, any comments are so very much appreciated xx


Thursday 12 June 2014

CASology 99


Before I share my latest entry for the CASology challenge, I would just like to say thank you to them all again for selecting my poppy card as worthy of an honourable mention. It really meant a lot :-)

As all Uniko Studio fans will know, the lovely Bev released another fabulous set of stamps this week. As soon as I saw the sneak peek of the Hummingbird set, I knew I just HAD to have it. It arrived in the post this morning and I wanted to use it straight away - so I did. Since the stamps have a very Art Deco feel to them, I decided to replicate this by using my deco cutter on the corners of the card and keeping the colours to a minimum.

As you may have read, I have become a wee bit too obsessed by shaker cards!! I really didn't set out to make another one, but I began thinking how complicated and yet quite fabulous it would be to make the hummingbird a shaker……so I set to work.

I decided that I wanted to emboss directly on to acetate which I knew was quite tricky to do. I had previously tried stamping and embossing and both were a complete disaster because the ink just smudged and the acetate was too static all over to withstand the embossing powder on the non embossed parts…..but I have found a trick that works. When I was undertaking the Watercolour for Card Makers Class, Jennifer Raza told us that if you didn't have an embossing buddy pad to rub over your card stock pre embossing to remove static, you could use cornstarch just sprinkled over (corn flower to us in the UK) and then wiped of with a baby wipe. I decided to try this with the acetate - I placed a large sprinkling of it in the centre and rubbed it all over the acetate ensuring a thin film of it was covering the whole area. I stamped my image and then covered with gold embossing powder. I was delighted with the result  - there were a few patches of stray EP, but i just wiped this off with my finger before heat setting.

Using foam pads on the hummingbird was a NIGHTMARE!!!! But, one technique I did do, was to colour some of the pads with a gold metallic pen before adding to the hummingbird so they would not be so noticeable!! This seemed to work quite well.

Anyway, enough talking - here is the card….


I hadn't originally planned to add sequins outside of the shaker, but at the last minute I got a bit ink on my finger which ended up on the card….ahhhh!!! The sequins therefore hide that nicely!!

As always, Any comments so very much appreciated.

Laura xx

Resources used
Cardstock - White and Black card stock from Papermill Direct, Acetate from Stationery Express
Inks - Onyx Black Versafine, Gold Papermania EP
Stamps - Paradise Hummingbird & Pure Florals: Chrysanthemum (Sentiment)
Embellishments - Sequins from Hobbycarft
Tools - We R Memory Keepers Art Deco Chomper

Wedding Stationery almost completed!!

Good evening all,

A some of you may know, I was asked by my friend to design and make her wedding stationery for her. My guidelines were that the colour scheme was to include a plum colour to match the bridesmaid's dresses (I am chief Bridesmaid!!!!) and there was to be a thistle and rose incorporated into the design. The thistle is the national flower of Scotland and the Rose, the national flower for England where the Husband and Wife to be are from respectively.

I had looked at various thistle and rose stamps but everything seemed a bit 'blah' and so instead, I honed my photography skills, transplanted a thistle bush into my garden, bought a bunch of cream Roses and tried to pretend that they were just growing side by side. Luckily, by the magic of photography depth of field, this looks like it is in fact the case!! Many pictures were taken of this situation, colours strengthened, weakened (or saturated I should say) until it was just right. This photograph appears on each of the stationery items. The invitations were to be a pocketfold design and I would highly recommend buying these pre-made if you are ever going to use them. I have done a wedding stationery collection for a couple before and I had 70 pocket folds to make by hand!!!! Nightmare!!!

Anyway, I have been SO busy working on this stationery as I have had the following to make:
75 x Pocketfold Invitations
120 x Orders of Service
150 x Guest name Tags
12 x Table names
50 x Menus
A table plan (not don't this yet as I need the details from the couple for this)
A Guest Book (plain one decorated as per the invite style)

Of course, when I was designing, I was trying to come up with the design that looked the best and did not overly consider the implications for myself of actually making them!! I have spent hours and hours doing it, but I have enjoyed every minute.

So, now to share with you all the completed designs….. (photos pretty poor due to the lighting conditions here today - camera flash out of batteries!!)

Pocketfolds


Orders of Service


Guest Name Tags


Table Names


Menus


Guest Book


The whole collection - somewhat squashed in together….


I hope you have enjoyed seeing what I have been so busily working on over the past few months…I have loved it, but must admit that I am looking forward to having more free time to concentrate on my own individual card designs!!

Many thanks for looking and as always, any comments always very much appreciated.

Laura xxx


Thursday 5 June 2014

Uniko Studio Challenge 10 and Time Out challenge 7

I am delighted to have managed to squeeze in some crafting time again today in order to get my entry completed for the Uniko Studio and Time Out challenges.

A couple of days ago I made my very first shaker card and as always, with trying something for the first time, there were a number of teething problems. I decided therefore, that I wanted to make another one in order to improve my confidence in this technique. Thankfully, this went much smoother!!

At Uniko Studio, we have been provided a gorgeous array of colours to choose from with the theme 'Thinking of You' and at Time Out Challenge, the theme is summer with the optional twist of flowers. As you will all know, one of my most favourite stamps (and most often used) is the Pure Florals: Chrysanthemum set and so I knew this would be ideal for both of the challenges.

Here is the lovely inspiration from Uniko Studio


I decided to concentrate on the pink shades and bring in the other colours through the use of the sequins in the shaker.

Here is my creation…..


I'm sorry the photo is awful dark - the weather has been awful again here today and my flash has run out of batteries - typical!!!

I began by die cutting the large Chrysanthemum outline on a piece of A6 card stock. I layer this over my A5 base card in the position I wanted it to be and used it as a template in order to stamp the large Chrysanthemum on the backing card. I then adhered my acetate to the back of the die cut image.
Before adding any foam pads to the front card, I positioned my twine and glitter strip. The foam pads were then added around the die cut shape and in the corners of the front card.

I picked out a variety of sequins matching the inspiration palette and put them in place before committing the front panel to the card. In order to finish the card off, I added a couple of tags in pink card stock and vellum. The vellum is embossed with Seafoam white EP using the sentiment from Flower Power 1 from Uniko Studio. I then added a button and a couple of pearl dots to the tag.

The smaller Chrysanthemum is then stamped and die cut and attached on top of the acetate. This then allows leaves the sequins to shake behind the smaller flower.

I feel this card gives a light summery feel and the shaker is just such fun!!!

Any comments as always so very much appreciated.

Laura xxx


Wednesday 4 June 2014

Triple entry!! - Runway Inspired Challenge 61, Less is More 174 & CASology 98

Realising that I SO had to get my head back in the game, I took a tour around my favourite challenge blogs and realised that the idea that I had in mind managed to fuse three of the challenges together.

The card I have created is one of those ones where I am feeling very smug about myself. I am not really one to blow my own trumpet, but I am in love with this card. Whether or not others love it, I am just so pleased with it myself!!!

The first challenge I came across what the new Runway Inspired Challenge which provided this photo from Delpozo….


It was the black and red that really spoke out to me in this card. I started thinking along the lines of ladybirds, apple (with black stock??), or maybe……a Poppy!!

I then saw that the CASology challenge word was Shine


……so a poppy made with glitter paper. Now, I don't have a poppy stamp - but that has never stopped me before…..I had just the thing in mind that might just work. My Uniko Studio Flower Power 2 set - not a poppy, but it could be made to look like one!! I also wanted to use the leaf from the Uniko Studio Chrysanthemum set. This then brought me to the Less is More challenge, which is to use more than one stamp.

I began my card by getting out my gold and red glitter cards. I stamped the leaf from Uniko Studio Pure Florals: Chrysanthemum set on the reverse of the gold and fussy cut it out. I then stamped the flower from flower power 2 on the back of the red card 3 times…..I fully cut out the first image, cut out all but two of the petals on the second image and on the final image, only cut out the other two petals. I assembled the leaf and flowers by placing down the leaf first, adding my fully cut flower first, added the flower with two petals missing using foam pads and then added the final two petals propped up on more foam pads on top…..this then created a three layered flower. For the centre, I cut a small circle of black velvet ribbon and again added with foam pads.

I knew exactly what text I wanted on the outside AND inside of this card, but I do not have stamps with these words….so it was time for the trusty laptop and printer and I simply printed the words I wanted. A couple of stars were added inside and voila. A really simple to make card that I happen to think packs quite a punch!!!!


Any comments as always very much appreciated

Laura xxx


A top 3 award and Guest Designer spot!!


I feel so ashamed to have entered a challenge and not have had the time to even check to see which fabulous entries won….this was what happened with the fabulous Inkspirational Card Challenge.

I had entered the card I made for my little boy's 3rd Birthday as seen below, but never dreamed that it would be chosen as a top three winner!! To me it was too much of a personal one - but in fact, that was exactly the reason why it was chosen!!! It was not until the lovely Carol told me that I had been selected that I remembered to take a look back at the blog…..shocking!!!!!


How even more embarrassing to then receive an email to say I had been selected out of the top three to be a Guest designer!!!!!!!! So, with my design brief in hand, I decided I had to create something extra special. I decided also that it was about time I took some inspiration from Carol and create my very first shaker card!!!! I mean, come on, I LOVE my bling on a card so why I have not made a shaker card yet it utterly beyond me!!!

Now I can't show you my full card yet, but I can show you a wee sneak preview….so here it is… watch out for my Guest Designer appearance soon on Inkspirational Card Challenge. I will also put a post on here in order to tell you a bot more about the thinking/story behind this card. 


As always, any thoughts, comments, suggestions always very much appreciated.

Laura xxx


Dropping back in to say hello and revisiting an existing card

Well hello there!!

It feels like forever since I was last in blog land and forever since I have been creating! I just don;t know sometimes where the time goes when you have two kids!!

Anyway, I am back with not one, but two and a half cards to talk about tonight….Keep reading - you will understand what I mean by the half soon!

The first card, is in fact one you will already have seen from my adventures on the Watercolour card class. I have now added a sentiment to it and have it ready to post off to my friend in order to accept the invitation to her wedding. It is one of the cards I entitled 'Tree of Life' as I managed to create the same card, using different colours for a variety of occasions.

Here it is -


As you will see, I am experimenting again with my photography location! It has been pouring down with heavy rain all day long here in Edinburgh and so to get out to my summerhouse in the garden would have just been a disaster. I decided to test out some of the wonderful ideas from the AMAZING Debby Hughes instead!! I adore how great the card looks just slightly faced to the side. As she said it would, you see so much more of the detail. This is definitely the way I am taking my photos from now on!! She gave another wee trick of putting your card up on a box in order to hide from the mess of your craft table - in this case however, it was to hide all the kids toys that were all over the room! I used this room though because it is huge glass windows all the way around and so was letting in what little light there was today.

I am not overly happy with the location/background - I do prefer my summerhouse, but it did the trick for today!!!!

This card is now safely in an envelope ready to send to my friend tomorrow.

As always, any thoughts, comments etc always very much appreciated.

Laura xxx